截至Ray 2.55,Google Cloud TPU已成为Ray的顶级加速器。这意味着TPU现在已经进入Ray的发布流程,拥有官方预构建的镜像,核心库支持,而不是过去那种“实验性”路径,自己构建容器并依赖社区帮助。在本“Run Ray on TPU”系列中,你将学习TPU切片如何成为Ray调度的另一个加速器(第一部分),然后逐一了解每个库(第二部分)。
Ray 是一个分布式计算框架:你编写 Python,Ray 将其作为任务(无状态函数)和演员(有状态工作者)在集群中运行。对Ray来说,TPU只是另一个可调度的资源,就像GPU一样。你要求,雷就把你的作品放上去。
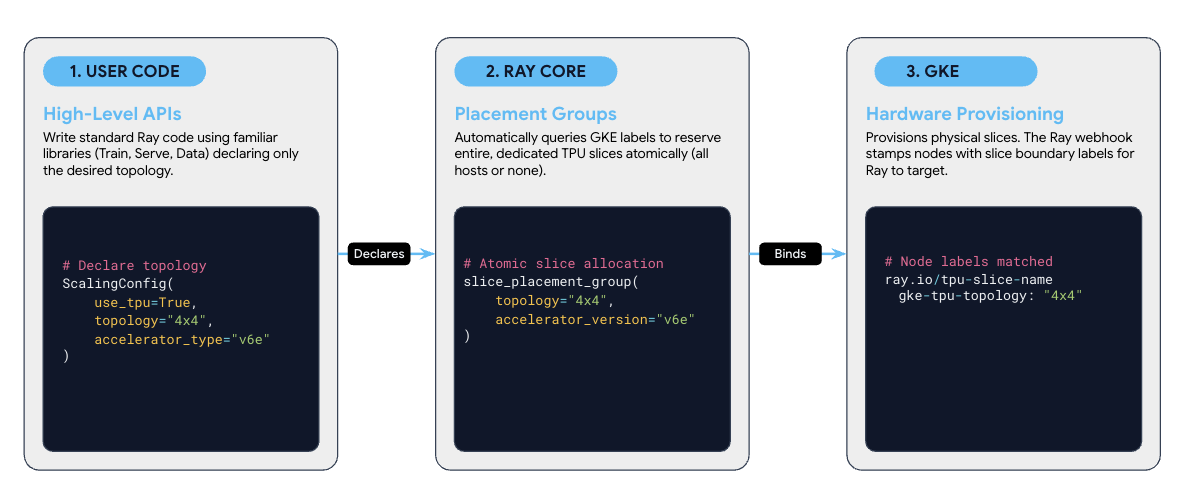
一旦你理解了 TPU 的切片和拓扑,现有的 Ray 栈和你的开发流程将保持不变,并且它会在 GKE 提供的 TPU 切片上运行。下图展示了整个系统的一张图:左侧是你编写的代码(你已经使用的 Ray 库);中间是 Ray Core 层,它保留了整片切片;右侧是 GKE 管理层,它提供硬件并标记,使 Ray 能够找到切片边界。
GKE 提供一个切片并标记其主机,Ray Core 读取这些标签以一次性保留整个切片,而你的库调用位于最上层,仅声明拓扑而不做其他操作。无任何手写的放置代码。本部分其余内容讲解底部的两层,先 GKE 再 Ray Core,而第二部分涵盖 Ray AI 库。
GKE 提供切片,webhook 给它打标签,Ray 读取标签。你编写 Python 代码。一旦插件启动,你将看到 KubeRay 操作器 Pod 正在运行,应用该清单会启动一个 head pod 加上切片中每台主机各一个 worker pod。示例的 get-started 集群步骤:https://github.com/GoogleCloudPlatform/kubernetes-engine-samples/tree/main/ai-ml/gke-ray/tpu/get-started/cluster 使用 Terraform 提供了所有这些。
真正将你的工作节点聚集在一起的是 Ray Core 原语,位于此层之上,即切片放置组,也是本指南其余部分的起点。
Ray Core 是基础层,是任务与执行引擎及调度器的一切依托。它的 TPU 支持存在于公共的 ray.util.tpu API 中,实际上只有一个函数需要了解:slice_placement_group()。它将之前提到的“保持我的工作节点在一个完整切片中”的保证转化为一个单独的调用,通过匹配 webhook 标签以原子方式(所有主机或者全无)预留整个切片。
需要强调的是,你很少会自己调用 slice_placement_group。Ray AI 库(Data、Train、Serve)会为你调用它,因此在实践中,你只需声明拓扑,它们会处理切片。你只会在编写自定义分布式工作负载(不是 Train、Serve 或 Data)时直接使用 slice_placement_group()。值得注意的一点是:该 API 是公开的,但标记为 alpha(@PublicAPI(stability="alpha")),所以目前可用,但接口在各版本之间仍可能发生变化。
现在你已经掌握了完整的思维模型:切片必须保持完整,GKE 提供并标记它,而 Ray Core 将其作为一个单位进行预留,因此你永远不需要手写放置代码。你实际构建的所有内容都建立在它之上并重用它。
在第二部分中,我们将探讨如何在 TPU 上使用 Ray AI 库通过 vLLM 提供 LLM 服务,利用 Ray Data 提供切片,并使用 JaxTrainer 进行训练。
TL;DR : If you already scale Python with Ray on GPUs, your code can now run on TPU (Tensor Processing Unit, Google's AI accelerator chip) with fully supported official APIs you already know. The task-and-actor model, a JaxTrainer, the same Ray Serve deployment just pointed at TPUs orchestrated by Google Kubernetes Engine (GKE).
As of Ray 2.55, Google Cloud TPUs are a first-class accelerator in Ray . This means that TPUs are now in Ray's release pipelines with official pre-built images and support across the core libraries, instead of the old "experimental" path where you built your own containers and leaned on community help. In this "Run Ray on TPU" series, you will learn how a TPU slice is just another accelerator Ray schedules onto (Part 1), then walk through each library (Part 2).
Ray is a distributed-computing framework: you write Python, and Ray runs it across a cluster as tasks (stateless functions) and actors (stateful workers). To Ray, a TPU is just another schedulable resource, the way a GPU is. You ask for it, Ray places your work on it.
But there is one thing to keep in mind, and then we move on.
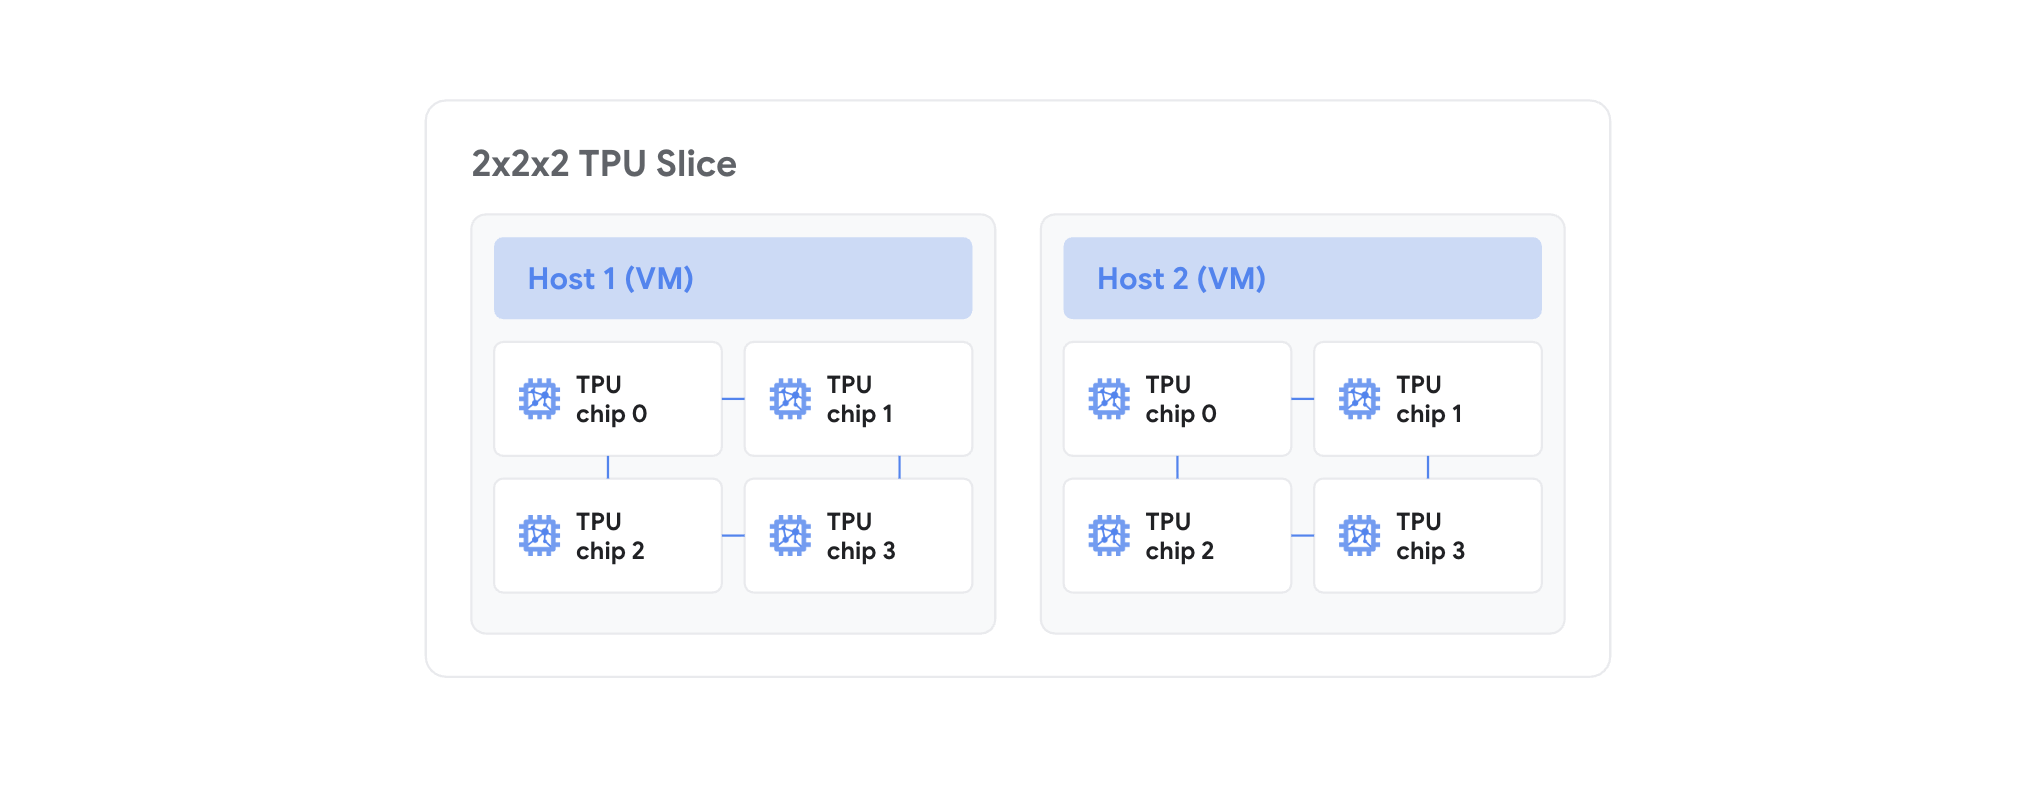
TPU chips are wired together into a fixed group called a slice : several host machines (VMs) whose chips share a dedicated high-speed link called the ICI (Inter-Chip Interconnect). A multi-host model has to land on one whole slice , or its workers can't reach each other and the job just hangs.
If you think in GPUs, picture a slice as a single multi-GPU box where the fast interconnect (NVLink) only exists inside the box. Split your workers across two boxes with no cable between them and the collective operations, the all-reduce steps that synchronize gradients, never finish. Training just hangs. A TPU slice behaves the same way: the ICI is that cable, and it only reaches the chips of one slice.
That's the whole reason "Ray on TPU" needs anything special. Something has to guarantee all your workers land on one intact slice. On GPUs you barely think about it; on TPUs it's crucial, and Ray and GKE (Google Kubernetes Engine, Google's managed Kubernetes) handle it for you.
One more word you'll see everywhere is topology : it's the shape of a slice, written like 4x4 for a 16-chip slice. You ask for a topology, not a chip count.
Once you understand slicing and topology with TPU, the existing Ray stack and your development process remains unchanged and it runs on TPU slices that GKE provisions. The diagram below is the whole system in one picture: on the left, the code you write (the Ray libraries you already use); in the middle, the Ray Core layer that reserves whole slices; on the right, the GKE managed layer that provisions the hardware and labels it so Ray can find slice boundaries.
GKE provisions a slice and labels its hosts, Ray Core reads those labels to reserve the whole slice at once, and your library call sits on top, declaring a topology and nothing more. No hand-written placement code anywhere. The rest of this part walks the bottom two layers, GKE then Ray Core while Part 2 covers the Ray AI libraries.
You run Ray on TPU through GKE using the Ray Operator add-on .
That single flag installs two things that matter for TPU. The first, KubeRay , is the Kubernetes operator that turns RayCluster, RayService, and RayJob YAML into running Ray clusters; it's the same KubeRay you'd use with GPUs. The second is the TPU-specific part: the Ray TPU webhook , which stamps every TPU host with labels like ray.io/tpu-slice-name so Ray can tell which machines are wired into the same slice. That label is the thread the whole system pulls on.
From there, you ask for TPUs in a manifest the same way you'd ask for any node, with a nodeSelector for the generation and topology and the chip count as a resource. A multi-host slice adds one field, numOfHosts.
GKE provisions the slice, the webhook labels it, Ray reads the labels. You write Python. Once the add-on is up, you'll see the KubeRay operator pod running, and applying that manifest brings up a head pod plus one worker pod per host in the slice. The cluster step:https://github.com/GoogleCloudPlatform/kubernetes-engine-samples/tree/main/ai-ml/gke-ray/tpu/get-started/cluster of the get-started example provisions all of this with Terraform.
What actually keeps your workers together is a Ray Core primitive sitting just above this layer, the slice placement group , and that's where the rest of the guide starts.
Ray Core is the base layer, the task-and-actor engine and scheduler everything else sits on. Its TPU support lives in the public ray.util.tpu API, and there's really one function to know: slice_placement_group() . It takes that "keep my workers on one intact slice" guarantee from earlier and turns it into a single call, reserving a whole slice atomically (all hosts or none) by matching on the webhook labels.
It is important to highlight that you rarely call slice_placement_group yourself. The Ray AI libraries (Data, Train, Serve) call it for you, so in practice you declare a topology and they handle the slice. You'd only reach for slice_placement_group() directly when you're writing a custom distributed workload that isn't Train, Serve, or Data. One caveat worth knowing: the API is public but marked alpha ( @PublicAPI(stability="alpha") ), so it's usable today but the surface can still shift between releases.
You now have the whole mental model: a slice has to stay intact, GKE provisions and labels it, and Ray Core reserves it as a unit so you never hand-write placement code. Everything you actually build sits on top of that and reuses it.
In Part 2, we will explore how you can use Ray AI libraries on TPU for serving LLMs with vLLM, feeding slices with Ray Data and training with JaxTrainer.
For now, thanks for reading! And if you have any additional questions or feedback, feel free to reach out on socials (LinkedIn:https://www.linkedin.com/in/ivan-nardini, X:https://x.com/ivnardini).
Expanding Choice in Gemini Enterprise Agent Platform: Introducing Grounding with Parallel Web Search
Building scalable AI agents with modular prompt transpilation
Driving the Agent Quality Flywheel from Your Coding Agent
情报判断
Aioga 编辑摘要
Aioga 编辑摘要:Ray 2.55 首次为 Google Cloud TPU 提供一等支持,开发者可通过 Ray 任务与 Actor API 在 TPU 上运行分布式 Python 负载。 Aioga 将其归入「产品更新」方向,重点关注它对真实使用和行业竞争的影响。

 扫码直达文章详情